We provided a turn-key aiming feature for the bones of agent, which can drive your agent bone aim to target. There are some subtle features of it.

Aim sentence activated
Preparation for Bone Axis
...

The X (or Z) should be aim axis and the Y should be up vector
Aim Sentences Features
The sentence conventions of aiming:
...
- The <Bone Name> should be the segment bone name from agent memory. You can check the real name in agent memory by Miarmy > Agent Viewer
- The <Axis & upvector> should be the axis of bone which you want to it aim to target, and the up pole vector you choose
- The <Target Object> name should be the unique name in Maya Scene. The dag nodes with the same name in different hierarchy many cause problems.
For example:
- bone:eyeL aim to:pSphere1 axis:ZY as speed 0.5
- bone:Head aim to:pSphere2 axis:ZY as speed 0.5
Once the sentence is activated, the bone which you specified will turn and aim to the target with a rotation speed gradually. This speed is determined by sentence result which range is 0 to 1.
Note: the aim turning process is interpolated by Quaternion, so there is no Gimbal Lock issues.
...

Gradually aim to target from default to aim pose
Percentage Aim
We can specify percentage in aim sentence to make the bone aim to right direction but not fully aim to target. For example, we can specify a 60% aim sentence like this, bone:Head (60) aim to:pSphere axis:ZY as speed 0.5, you may notice the bone will approach to the 100% aim pose but not fully aim to target. Finally, it will stand the pose which performs 60% aim direction between the default pose and 100% aim pose.

60% aiming make non-full aim result
...
Self-restitution
Once the sentence is not true (the default output value of each aim sentence is -0.2) or the sentence result is negative, the bone will resume back to the default pose gradually and automatically.

Resume back to default pose automatically
Aim Space
Aim space is simple. In some case, we just want to the bone aim to target in horizontal space, such as our "neck". Our head can rotate to any directions but our neck can only rotate in some degree in Y axis:

Use 3d for the head whereas 2d for the neck
...
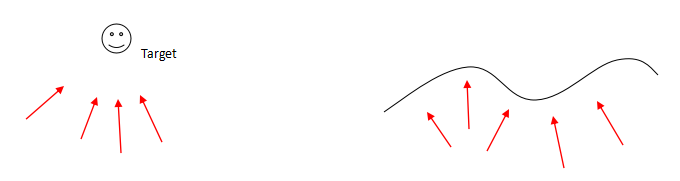
Aim Target Type
Aim target can be 2 different types, points and curve (shape area). It depends on the target object name which you filled in the decision node.
Fill a transform node makes the agents aim to the point, while fill a curve shape node makes the agents aim to the chosest point from agent to the curve shape.
- bone:head aim to:pSphere1 axis:ZY as speed 0.5
- bone:head aim to:curveShape1 axis:ZY as speed 0.5
Hierarchical Aim Mechanism
This process is entire automatically, and here we just explained what is happen under the hood.
When you have multiple bones in the same hierarchy want to aim to the same (or different) target, the order of aim bone may cause problem. Imagine that your hand and arm want to point to the some targets. If your hand point to the target firstly, and then you rotate your arm secondly, after your arm aligning to its target, maybe the previously done hand will not point to right direction.
With Miarmy hierarchical aim mechanism, we firstly collect all aim tasks and then execute them hierarchically. For example in the arm tree, it's definitely arm will aim to target before the hand performing aim.
Multi Targets Choose
Rather than Maya traditional aim constrain, we can make the agent bone to aim arbitrary number of targets, just using simple sentence active:
Let's take a look at the following example directly.
We want to our agents aim to right sphere when they are in blue bound whereas aim to left sphere when they are in red bound.
...
The bone will always aim to the target which makes the output the most activated.