Miarmy Crowd Simulation Documentation (English)
Menu and Editor
Miarmy Global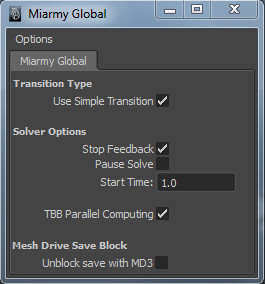
- Transition Type
- Use Simple Transition
If enable, the transition map will be ignored by engine. Transition will automatically happened by themselves between any 2 actions.
- Solver Options
- Stop Feedback
If enable, the agent will not send information to Brain Viewer. It will save your time if you are already done the logic construction.
- Pause Solve
If enable, the simulation will be paused. And if you disable this at the frame you enable this, the simulation will continue.
- Start Time
Specify the simulation start frame.
- TBB Parallel Computing
Enable Intel TBB Paralleled Computing
- Mesh Drive Save Block
- Unblock save with MD3
By default Miarmy not recommend user save scene with duplicated mesh in scene, enable this make this file can be saved with Mesh Drive Enable
Physics Global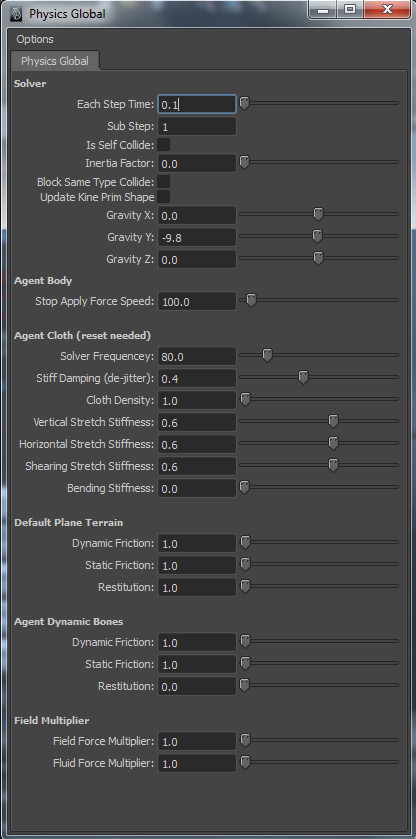
- Solver
- Each Step Time:
Specify how much time will proceed in one Maya frame
- Sub Step:
Specify how many steps will make in Each Step Time
- Is Self-Collide:
Specify whether you need enable collision on bones of single agent
- Inertia Factor:
How much (in percent) speed will inherit from action when enable dynamics
- Block Same Type Collide
Stop checking collide with same type of agent
- Update Kine Prim Shape
Update shape of kinematic primitive in each frame
- Gravity X:
Gravity acceleration in X direction
- Gravity Y:
Gravity acceleration in Y direction
- Gravity Z:
Gravity acceleration in Z direction
- Agent Body
- Stop Apply Force Speed
When the speed of RBD exceeds this value, the force field cannot add force on to it.
- Agent Cloth
- Solver Frequency
Solver frequency specifies how often the simulation step is computed per second. For example, a value of 60 represents one simulation step per frame in a 60fps scene. A value of 120 will represent two simulation steps per frame, etc.
- Stiff Damping (de-jitter)
The damping coefficient is the portion of local particle velocity that is canceled in 1/10 sec.
- Cloth Density
The particles' density of cloth
- Vertical Stretch Stiffness
Stiffness in horizontal direction, bigger value leads harder deform in horizontal space
- Horizontal Stretch Stiffness
Stiffness in vertical direction, bigger value leads harder deform in vertical space
- Shearing Stretch Stiffness
Stiffness in diagonal direction, bigger value leads harder deform in diagonal space
- Bending Stiffness
Stiffness of bend down, bigger value make not easy to curly
- Default Plane Terrain
The attribute effect on the plane terrain default created.
- Dynamic Friction
The friction force when object is moving on terrain
- Static Friction
The friction force when object is before moving on terrain
- Restitution
The energy of bounces back from collision, increase this make object bounce greater on the default terrain
- Agent Dynamic Bones
The attribute effect on the agent body default created.
- Dynamic Friction
The friction force when object is moving on terrain
- Static Friction
The friction force when object is before moving on terrain
- Restitution
The energy of bounces back from collision, increase this make object bounce greater on the default terrain
- Field Multiplier
Exclusive adjust the force effect on the rigid body of Miarmy. If the Maya field or fluid affects both Miarmy contents and Maya contents, you can adjust these values to change the result only on the Miarmy contents.
- Field Force Multiplier
The value will be multiply the result force effect on the rigid body from Maya field
- Fluid Force Multiplier
The value will be multiply the result force effect on the rigid body from Maya fluid
Render Global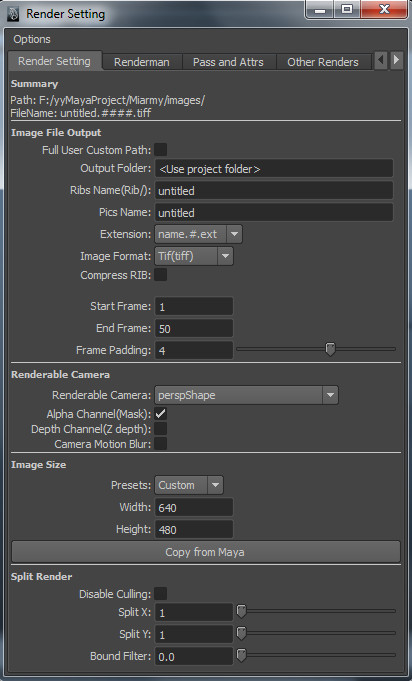
- Summary
First line: The result folder name of output image or rib
Second line: The result file name of output image of rib
- Image File Output
The attributes can change the file export name, format and path
- Full User Custom Path
Make the user specified path totally, will not add any sub folder or camera folder
- Output Folder
The location your image files of each pass will output
- Ribs Name(Rib/)
The file name of RIB file
- Pics Name
The file name of image file
- Extension
The file name extension
- Image Format
The format of output image
- Start Frame
The frame the render will start
- End Frame
The frame the render will end
- Frame Padding
The bit of digits of file name endin
- Renderable Camera
Adjust the camera attributes
- Renderable Camera
Select the renderable camera here
- Alpha Channel
Enable this if you want to export alpha channel
- Depth Channel
Enable this if you want to export depth channel
- Camera Motion Blur
Enable this if you want ot apply motion blur when camera is moving
- Image Size
- Preset
Choose width and height presets
- Width
The X resolution of output image
- Height
The Y resolution of output image
- Copy from Maya
Copy the same setup from Maya Render Global node
- Split Render
To know more about split render, please refer the render part of this manual.
- Split X
The number of parts the viewport should be split in horizontal space
- Split Y
The number of parts the viewport should be split in vertical space
- Bound Filter
The filter pixels which between any 2 split parts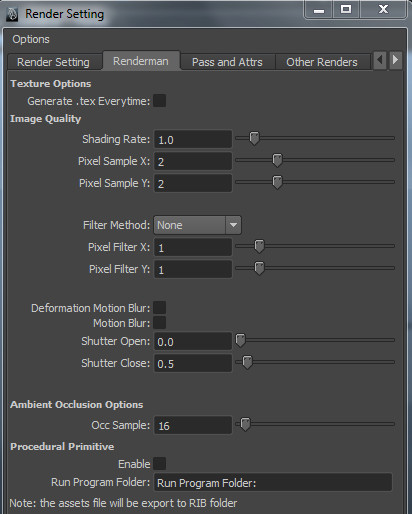
- Texture Options
- Generate .tex Everytime
The system will generate a .tex texture file for each of texture file and send the .tex file to the RenderMan renderer when rendering. By default, the system will check the existence of that .tex file, if there is .tex file exist, system will not generate them again. If you need convert it every time, please enable this.
- Image Quality
The attributes exclusive belong to RenderMan and control the quality of output images
Please refer the RISpec if you want to know them in details
- Shading Rate
Minimum rate of surface shading
- Pixel Sample X
Sampling rate in the horizontal directions
- Pixel Sample Y
Sampling rate in the vertical directions
- Filter method
Antialiasing by filtering the geometry (or supersampling) and then sampling at pixel locations
- Pixel Filter X
The filter in horizontal directions
- Pixel Filter Y
The filter in vertical directions
- Deformation Motion Blur
Enable this to enable deformation motion blur, only available with agent cache
- Motion Blur
Enable this to enable motion blur
- Shutter Open
The times at which the shutter opens
- Shutter Close
The times at which the shutter closes
- Ambient Occlusion Options
- Occ Sample
Increase this can get smoother result (less noise) but take more time to render
- Procedural Primitive
- Enable
Enable procedural primitives when export RIB
- Run Program Folder
Specify the run program folder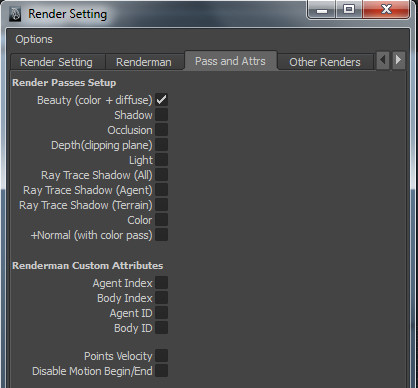
- Render Passes Setup
Specify which pass or passes should be rendered
- If in preview mode (Miarmy > Render Preview), renderer will render the first option which enable here.
- If in batch mode (Miarmy > Render Extra > Render Batch to Image Files/RIB Files), renderer will render all the options enabled here.
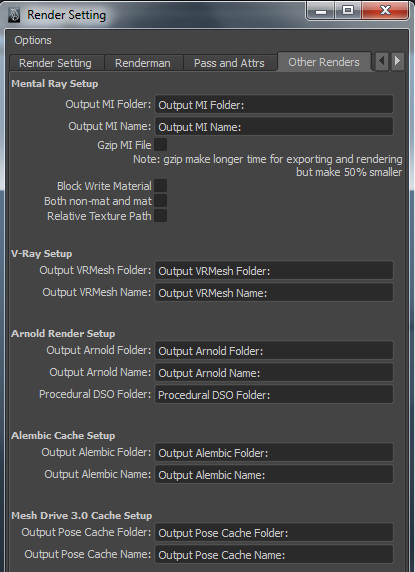
Other Renders Tab is the place for setting up the other renderers output paths or names
Render Preview (i-display)
Render current frame from current active viewport and put the image to the frame buffer (or i-display). The pass to be rendered should be the first pass enabled in Render Pass Setup of Render Global.
Render Extra (sub menu)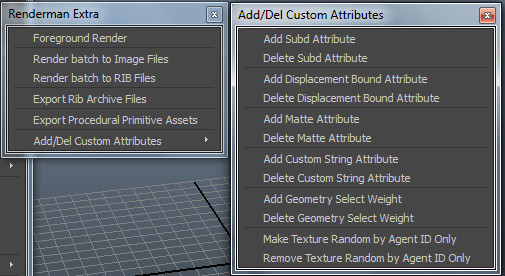
- Foreground Render
Open Maya Render View, and render this scene from start frame to end just inside of Maya
- Render Batch to Image Files
Render this scene from start frame to end frame and output the images to the folder been specified in Render Setting
- Render Batch to RIB Files
Convert the scene to the RIB files start frame to end frame and output the RIB files to the folder been specified in Render Setting
- Export Rib Archive Files
Export rib file with only agent info as archive file can be referencing back
- Export Procedural Primitive Assets
Export the necessary assets for procedural primitive generation
- Export Rib Archive Files
Add or remove custom render man attributes:
- Add Subd Attribute
Add 2 attributes to the selected objects, so that the objects can be recognized to the subdivision mesh by the render engine.![]()
- Delete Subd Attribute
Remove the 2 attributes of subdivision mesh flags from selected objects
- Add Displacement Bound Attribute
Add an attribute to the selected objects, so that the renderer will use this value when dealing with displacement shader![]()
- Delete Displacement Bound Attribute
Remove the attribute of displacement bound from selected objects
- Add Matte Attribute
Add an attribute to the selected objects, so that the renderer will render it totally black but alpha channel existed.![]()
- Delete Matte Attribute
Remove the attribute of matte from selected objects
Note: if this attribute is added to the agent instead of geometry, the specific agent will matte out all the geometries it used
Agent Viewer (Auto Focusing)
The Agent Viewer will display the bone structure and some flags set in Agent memory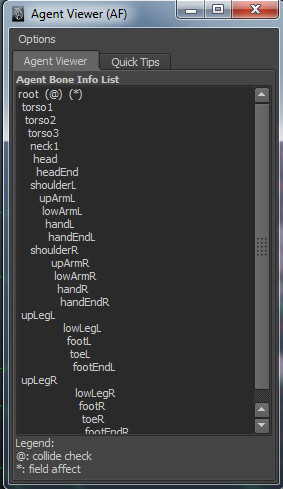
- Bone structure:
The name of bone in memory, it can be used in channel, like torso1:tx
- Flags
- (@) sign
This bone will join collision check if using "collide" channel
 sign
sign
This bone can feel field and fluid when dynamics is turned on
Agent Manager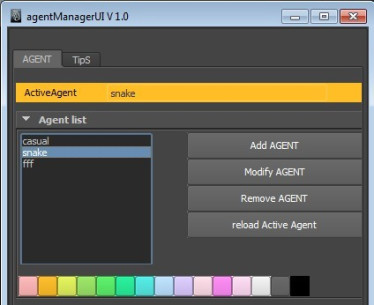
Agent manager can determine which type of agent is activated. System will create contents such as logic decision nodes or action nodes for the active agent and put the contents inside the active agent group.
- Active
Active the agent type in this line
- Modify
Modify the name of agent
- Delete
Delete all the contents of this agent
- Color buttons
Select color for active agent, when the agents are placed, the color of bones will be the same color selected here
- Add Agents
Add a new type of agent to scene
Terrain Manager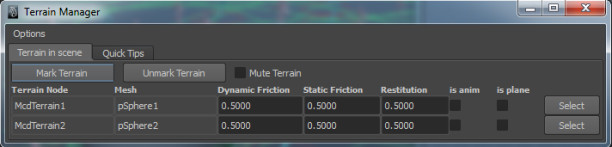
Terrain manager can mark geometry terrain. When the geometry is marked terrain, the agents can interactive with it and the rigid body can collide in it. In fact, the geometry which been marked terrain is connected by a McdTerrain node.
- Terrain Node
The McdTerrain node name which connected to terrain geometry
- Mesh
Actual mesh name been marked terrain
- Dynamic Friction
The friction force when object is moving on terrain
- Static Friction
The friction force when object is before moving on terrain
- Restitution
The energy of bounces back from collision, increase this make object bounce greater on the terrain
- Is anim
Enable this if the terrain has animation or deformation.
- Is Plane
Enable this if the terrain is a plane, it can speed up the physical simulation
- Select
Select the transform node of this terrain geometry.
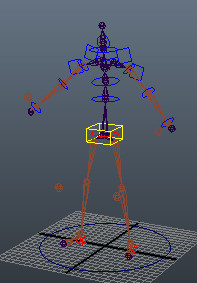
Visualization
- Sound range switch
Switch on/off the sound range
- Vision range switch
Switch on/off the sound range
As the picture above, the red circle is sound range, and the green frustum is the vision range.
Setup Rig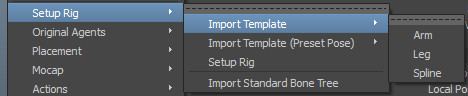
Miarmy provide a free setup pipeline tool, which can generate a simple rig from the template.
- Import Template
Import template with default pose
- Import Template (Preset Pose)
Import template with the preset pose
- Setup Rig
Convert the template to the rig
- Import Standard Bone Tree
Import a clean and preset posed bone chain which can be used to motion capture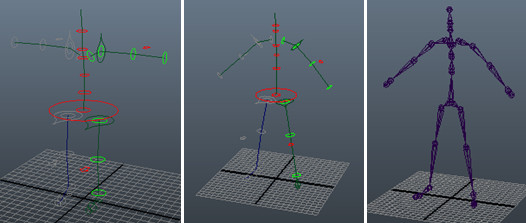
Above 3 pictures, from left to right:
- Template with default pose
- Template with preset pose
- Bone chain with preset pose
After setup, the rig has been generated.
Original Agents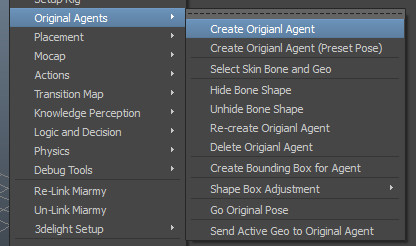
- Create Original Agent
Create Original Agent if there is correct rig in Setup group for the active agent type
- Create Original Agent (Preset Pose)
Create Original Agent with many preset setup
- Select Skin Bone and Geo
Select all the joints except end ones from current active original agent
- Hide Bone Shape
Hide all the box shape of the bone
- Unhide Bone Shape
Unhide all the box shape of the bone
- Re-create Original Agent
Delete the current active original agent and create it again. If you delete some important part from original agent, you can use this tool
- Delete Original Agent
Delete the current active original agent
- Create Bounding Box for Agent
Create bounding box for current active agent
- Shape Box Adjustment (This feature is not finished yet)
- Go Original Pose
Clear all rotation value from original agent and put it to the origin
- Send Active Geo to Original Agent
Copy geometries and skinning info from setup rig to Original Agent, only can work on active agent type
Placement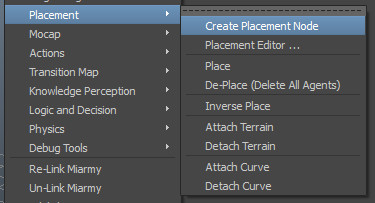
- Create Placement Node
Create a placement node for you
- Placement Editor

Placement editor can setup the proportion for the selected placement node
- Proportion Setup (slider)
Only the place-able agent type can be listed here. The agent with original agent is correct agent type. Move any of the slider, the others types will automatically update except 0 proportion type
- 0 proportion
Crank down to 0 for turning off this type of agent place![]()
- Make Even
Auto averaging all the proportion of exist types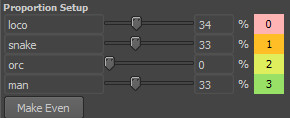
- Place
Populate agent to scene.
- De-Place (Delete All Agents)
Delete all the agents and flush the undo queue. We not recommended delete agents by "del" key because that the agent is actually leave there in memory.
- Inverse Place
Create a brand new place node from the selected agents, and this will record follow info:
- Parent node of each agent
- Type of each agent
- Translate and Rotate
- Mute dynamic flag
- Attach Terrain
Attach place node to the selected terrain
- Detach Terrain
Detach place node from terrain
- Attach Curve
Attach place node to the selected curve
- Detach Curve
Detach place node from curve
Mocap
- Import Standard Bone Tree
Import a clean and preset posed bone chain which can be used to motion capture
- Human IK (available next time)
- Characterize (available next time)
Actions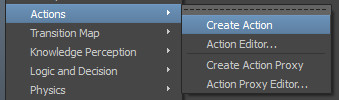
- Create Action
Create an action node, then playback once and store the animation data to this node, from rig (with animation) to action
- Action Editor
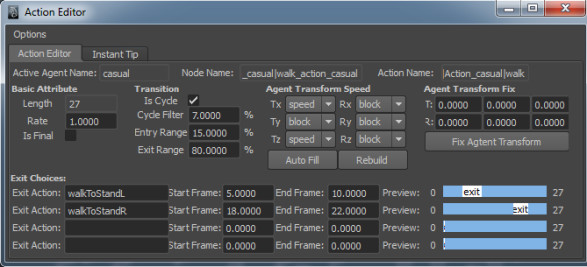
- Basic Attribute
- Length
- Basic Attribute
The length info of current selected action
- Rate
The playback speed multiplier, e.g. 2 means playback speed is 2 times than normal
- Is Final
Enable this means that once agent transit to this action, never transit out, e.g. dead
- Transition
Control the transition between 2 actions
- Is Cycle
Enable: cycle action (e.g. walk), Disable: transition action (e.g. standToWalk)
- Cycle Filter
A percent value stand for a smooth filter when the action performing self-cycle transition
- Entry Range
The range of transition from previous action to the current one
- Exit Range
After this percent range, this action can transit to next action, before that, it playback itself
- Agent Transform Speed
The speed of transform node of the agent, this can create the locomotion result, please check out the detail of this in Animation and Action session
- Channel(TX, TY, TZ, RX, RY, RZ)
Block/Open the channel on agent transform node
- Auto Fill
Use the preset channel preset
- Rebuild
Important: After editing the channels, user need click this rebuild button make it works
- Agent Transform Fix
This feature can offset the result of transform speed of the root, e.g. one of the motion capture data is x-oriented, but one can use this feature to rotate it back to z-oriented action
- Transform Data
Specify which channel and how many values need offset
- Fix Agent Transform
Once specify the value in blank, click this for performing offset
- Exit Choices
In different phase, action can transit to different next actions. We can specify the exit choices here
- Exit Action
The list of actions which the current action will transit to
- Start Frame & End Frame
Between start and end frame, the current action will transit to this exit action if there is a transition signal
- Preview Bar
Preview in which phase we can transit to which exit action
- Create Action Proxy
Create an action proxy node for current active agent type
- Action Proxy Editor
Action proxy can check the transition between any actions and see is them transit smooth or correct
For more details of action proxy, please check out the Transition session of this manual. 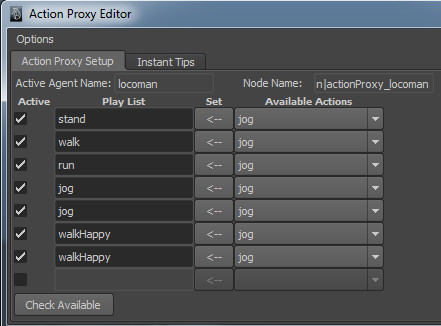
- Active
Activate/deactivate element of agent name
- Play list
The names of actions in list
- Set
From right to left set
- Available Actions
Choose which action to be set
Transition Map
(Note: need switch to the transition map viewport)
- Move tool
Click and drag to move the states and action shells in transition map viewport
- Create State
Create a new state node for current active agent type
- Create Action Shell
Create a new action shell node for current active agent type
- Add/Edit Action Group
Add an action group flag to the selected action
- Cancel Action Group
Remove the action group flag from the selected action
Knowledge Perception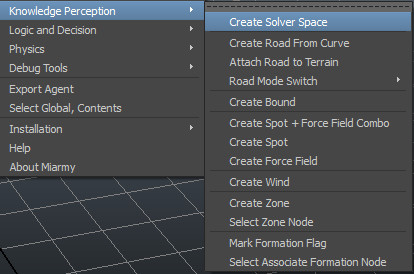
Please check out the channel spec for the detailed information
- Create Solver Space
Create a solver space node
- Create Road from Curve
Create a road object from your selected curve, the agent can feel it
- Attach Road to Terrain
Attach the road to terrain
- Road Mode Switch
Switch road between flow and road modes
- Create Bound
Create bound box/sphere so that the agent can feel it
- Create Spot + Force Field Combo
Create a spot node and set the Feel Mode to "both"
- Create Spot
Create a spot node and set the Feel Mode to "Only Spot"
- Create Force Field
Create a spot node and set the Feel Mode to "Only Field"
- Create Wind
Create a wind node so that the agent can feel it
- Create Zone
Convert the selected geometry to zone object
- Select Zone Node
Select the geometry firstly, and then this tool can help you get the related zone node
Logic and Decision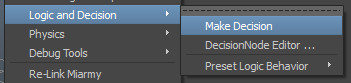
- Make Decision
Create a decision node for the active agent type, for detail, please check out the logic part of this manual
- Decision Node Editor
- Input Part (Normal Mode)
The inner logic part
- Make Default/Global Button
Change the current selected decision to Global Mode
- Active
Activate/Deactivate of this sentence
- Priority
The priority of this sentence, bigger value has higher priority
- Logic
The operate before this sentence
- Not
Determine whether invert the logic result
- ID
The Identity of this sentence assigned by the system
- Input
Input sentence
- Inf
Whether infinity for the fuzzy range in, e.g. "< 10" means negative infinity to 10
- Min
The minimum/start value of range in which the result will be true
- Inf
Whether infinity for the fuzzy range out, e.g. "> 10" means 10 to positive infinity
- Max
The maximum/end value of range in which the result will be true
- Fuzzy In
Blur the start of true range, not available when negative infinity
- Fuzzy Out
Blur the end of true range, not available when positive infinity
- Input Type
Chose the input type between max or average
- Max
Take the result which makes this sentence fully activated
- Average
Take all the results and calculate out the average, then calculate the activation of this sentence
- Auto Fill
Some presets for the user, one can add new preset in McdSentencePresetListGUI.py
- Move Up
Change the order between 2 sentences up and down, move current sentence up
- Del
Delete current sentence
- Parse Result
The result of inner logic
- Output Part (Normal Mode)

- Active
Activate/deactivate output channel
- Decision
The output decision
- Value
The output value if full activated
- Auto Fill
Some presets for the user, one can add new preset in McdDecisionPresetListGUI.py
- Decision (Global Mode)
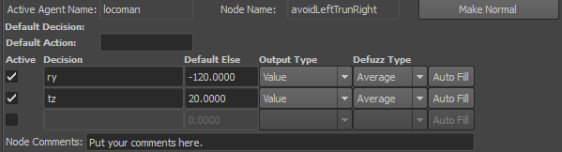
- Make Normal Button
Change the current selected decision to Normal Mode
- Default Action
Play this action when there is no other action activated.
- Active
Activate/Deactivate the default output channel
- Decision
The output channel
- Default Else
System will use this value when the channel are not been activated
- Output Type
The output value change type, absolute value or change rate
- Defuzz Type
The output defuzz type average/blend/max
- Auto Fill
Some presets for the user, one can add new preset in McdDecisionPresetListGUI.py
- Preset Logic Behavior
Create the preset logic decision nodes for current active agent type
Physics
- Cloth Setup
- Attach Cloth (Tip: points to box)
Mark cloth for selected geometry and attach the selected points to the bone shape of original agent (firstly select the cloth points, then the bone box shape)
- Clear Cloth
Unmark the cloth for the selected geometry
- Force Field
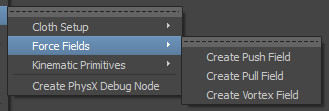
Create PhysX force field
- Kinematic Primitive
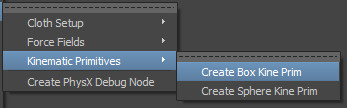
Create PhysX kinematic Primitives
- Create PhysX Debug Node
Create a PhysX debug node which can display all the contents of PhysX scene.
Debug Tools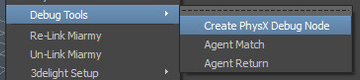
- Create PhysX Debug Node
Create a PhysX debug node which can display all the contents of PhysX scene.
- Agent Match
Match the original agent to the selected agent, this feature is used to integrate your baking or rendering pipeline
- Agent Return
Put the original agent back to origin and default pose
Re-Link Miarmy
Reconnect your Miarmy if you install a new version in the other place
Un-Link Miarmy
Disconnect Miarmy from this Maya
3Delight Setup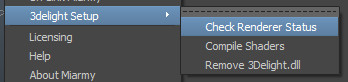
- Check Renderer Status
Check is your 3delight been installed correctly, check are your 3delight paths been setup correctly, check are your 3delight shaders been compiled ok, etc. If there is anything incorrect, the finished dialog will report them
- Compile Shaders
Find the source code of shader in Miarmy installation place and compile using your installed 3delight program, then put the result shaders into 3delight shader path
- Remove 3delight.dll
Remove the 3delight.dll from your Maya bin folder. Because system will copy a 3delight.dll to your Maya bin folder when installing, this 3delight will proxy/take over the 3delight of yourself if you already using your own 3delight. Delete the 3delight Miarmy provided here.
Basefount Technology